Implementing Secure OAuth 2.0 Authentication with Client Credential Grant in IBM API Connect v10
Hello Tech Enthusiasts 👋,
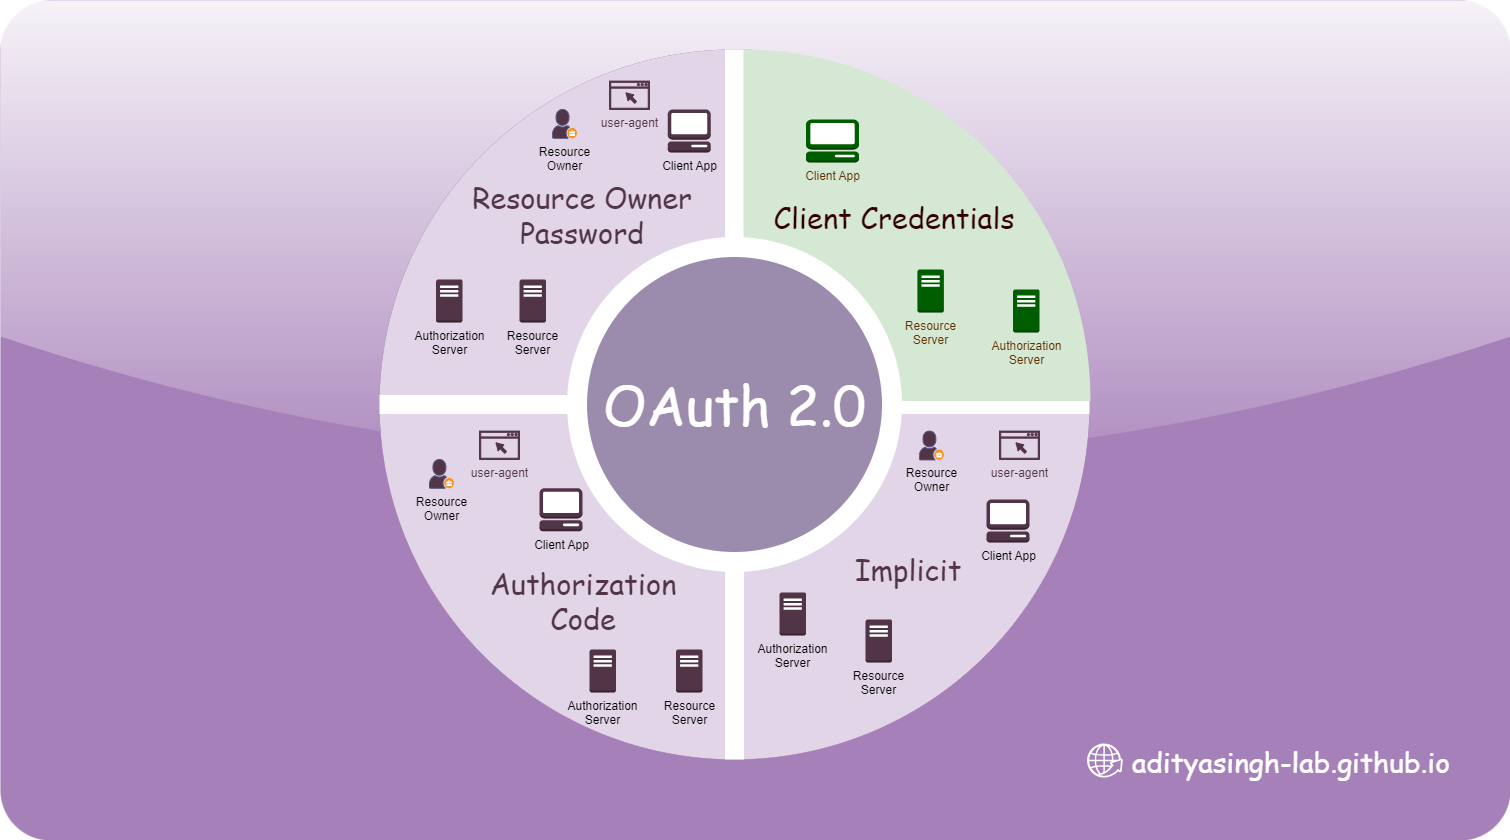
This article is the start of deep diving into the different form of OAuth implementation in IBM API Connect. To start with, let’s first clear our understanding of OAuth 2.0 (OAuth 2.1 is in draft )
OAuth Overview
OAuth began as a solution to a common problem i.e.: Users needing to share access to their accounts on one platform with another platform without sharing their credentials. The need arose primarily from the experiences of developers working on platforms like Twitter and Flickr. They needed a secure way to delegate access without compromising user privacy. The first version, OAuth 1.0, was created in December 2007 as an open protocol. It was spearheaded by Blaine Cook (Twitter) and Chris Messina (Flickr) with contributions from other developers.
OAuth 2.0, published in October 2012, it introduced the use of bearer tokens, making it easier for developers to implement. OAuth 2.0 also expanded its use cases, enabling mobile and web applications to use delegated authorization seamlessly. Over time, OAuth 2.0 became widely adopted by major platforms like Google, Facebook, and Microsoft. It has since been enhanced with extensions and best practices such as:
- OpenID Connect (OIDC) for identity authentication.
- Proof Key for Code Exchange (PKCE) for securing mobile applications.
OAuth’s evolution reflects the growing importance of secure and efficient user authentication and authorization in modern web and API development. It remains foundational to secure data exchange in today’s interconnected digital world.
OAuth in IBM API Connect v10
OAuth in IBM API-Connect already been offered since version 2 (earlier IBM API Management v2/v2/v4) which is referred as Native OAuth Provider. It used to be developed as an API earlier which is now as resource (like TLS, User-Registries) Some considerations while implementing OAuth resource in IBM API Connect v10:
The gateway type is important. Both v5 compatible and Native API Gateway offers all grant type, the Native API Gateway offers much more features compare to v5 compatible.
- The resource needs to be implemented manually (not something available to automate as part of toolkit command line yet).
- OAuth API Editor feature can be used to export / import to higher environment while publishing resources.
Implementing Client Credentials Grant {DataPower API Gateway}

 OAuth Implementation in IBM API Connect
Step 1 : Create Native OAuth Provider
- Go to Resource > OAuth Provider
- Select Native OAuth Provider
- Title
OAuth-Client-Credential-Grant, and Base-Path as/oauth-client-credential-grant. - On the next, select the checkbox ‘Application’ which is for Client Credentials grant.
- Leave the Token path as
/oauth2/token. - Enter Scope as
application. - Go to next screen and click Finish.
Step 2: Add OAuth Provider to Sandbox Catalog
- Click Manage on left Menu > Sandbox > Catalog Setting > OAuth providers.
- Click Edit and Select ‘OAuth-Client-Credential-Grant’.
- Click Save
Step 3: Create OAuth Secure API
- From API-Connect Toolkit or API-M UI, create new API
OAuth-Secure-Client-Cred-APIwith path as/test-oauth-secure. - Select no secure (as we update after API creation).
- After the API created, select the API and scroll down to ‘Security Schemes’.
- Click Add and give name as
oauth-client-credential. - In the ‘Security’ section, click add amd select ‘oauth-client-credential’ and scope ‘Application’.
- Click Save and publish the API / Product
For simplicity, in the Gateway design tab, I’m having Set-Variable to return
{"Code": 200, "result":"Success"}response set in ‘message.body’
Step 4: Subscribe
- Create a new test application and subscribe it to the OAuth-Secure-Client-Cred-API.
- Copy the client-id and client-secret (to be used in next step)
Step 5: Testing
To test the API, we first to get the token and next, use the token to validate. Here is the sequence diagram 👇:
 Sequence Flow : OAuth Implementation in IBM API Connect
GET OAuth Token
- To extract the token, open PostMan > Create new HTTP Rest API Request
- Select Method as POST.
- Body as x-www-form-urlencoded.
- Add following Key and Value
1
2
3
4
grant_type:client_credentials
client_id:<client-id copied in step 4>
client_secret: <client-secret copied in step 4>
scope:application
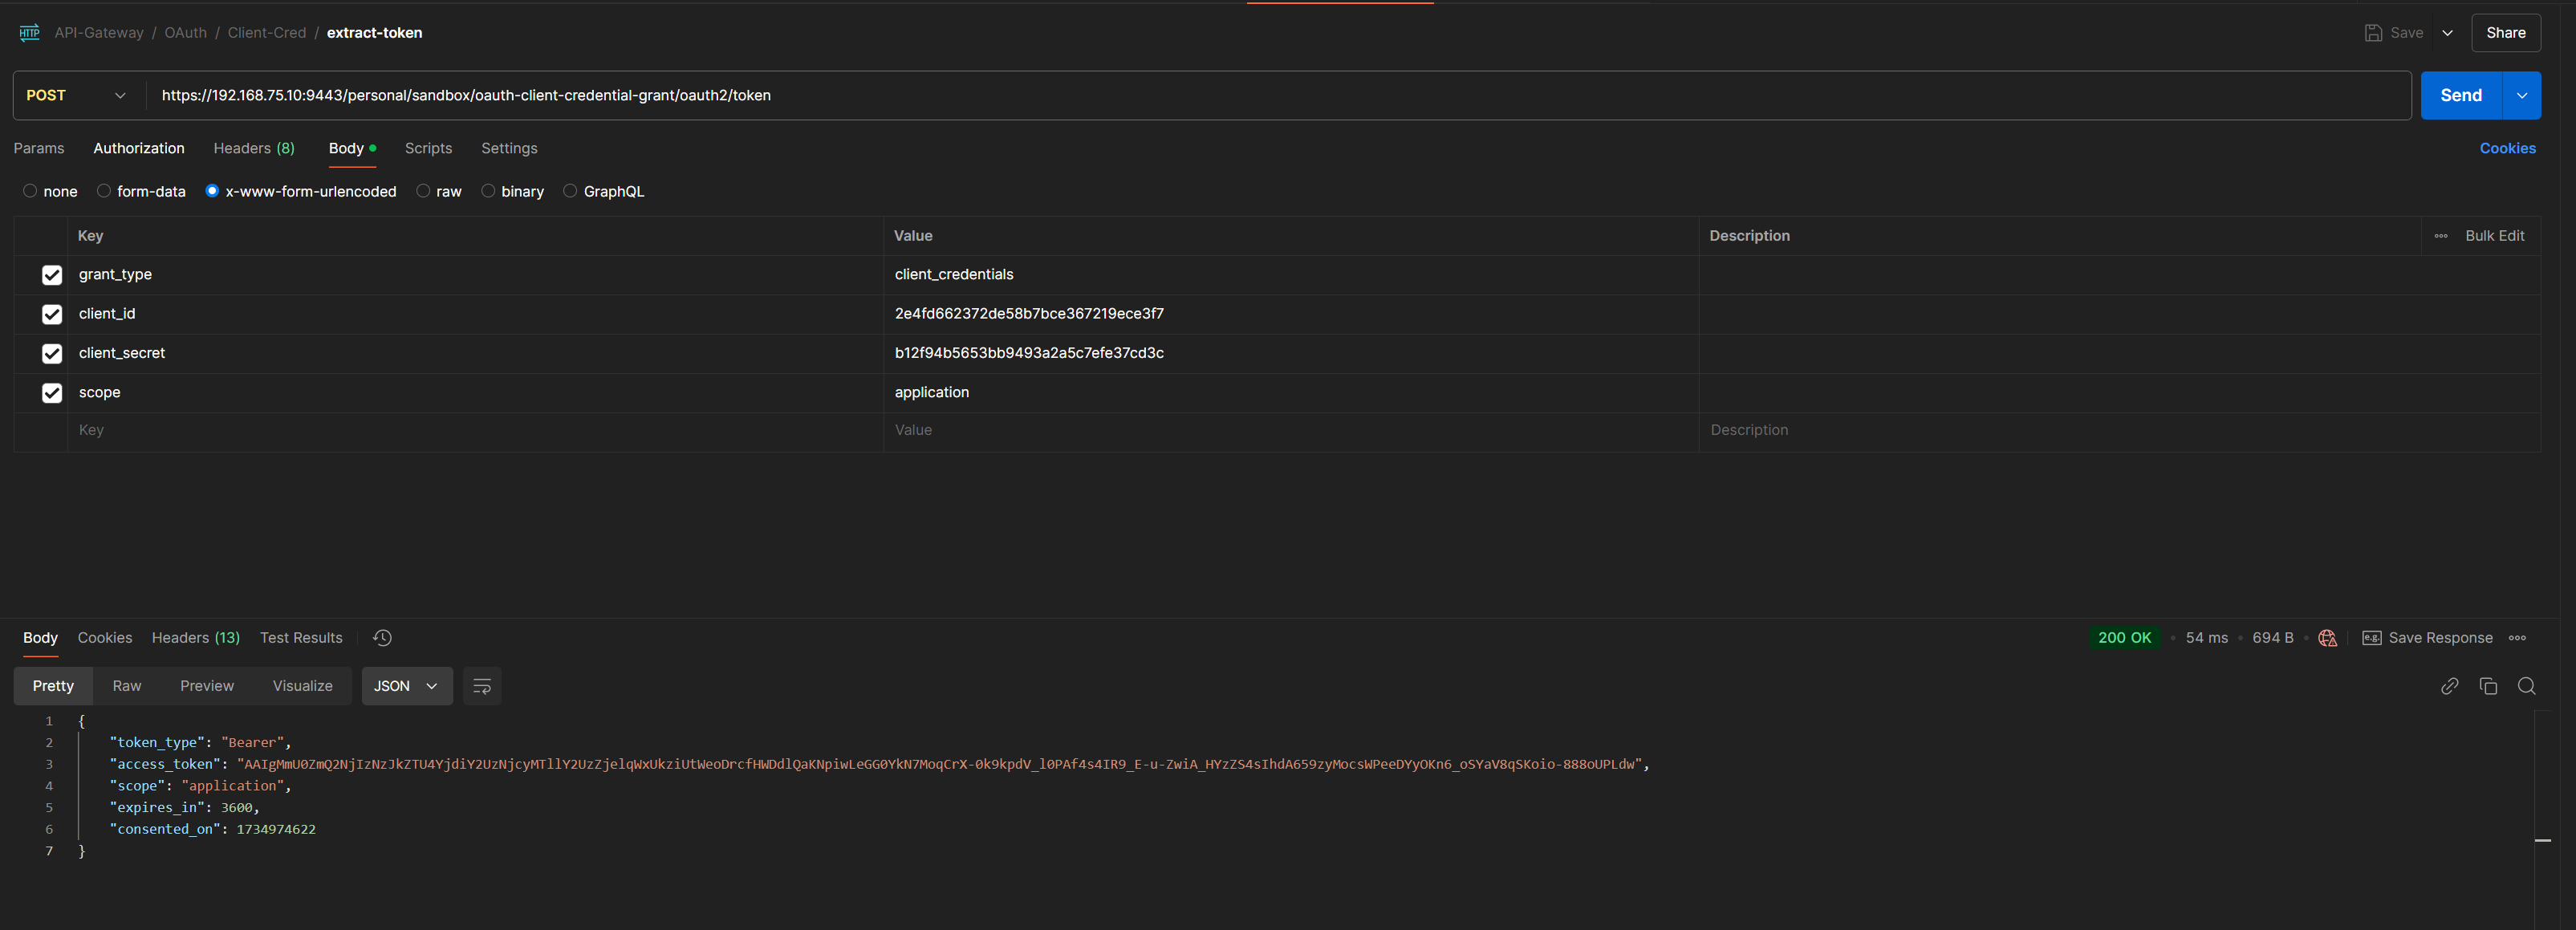
 Postman Screenshot of Extracted token
Test the OAuth Token
- Copy the
access_tokenreturned in the response of Step 5. - Create another Http request in Postman with Method as GET.
- Form the URL as per API created
- Select Auth type as Bearer Token in Authorization tab and pasts the
access_tokencopied.
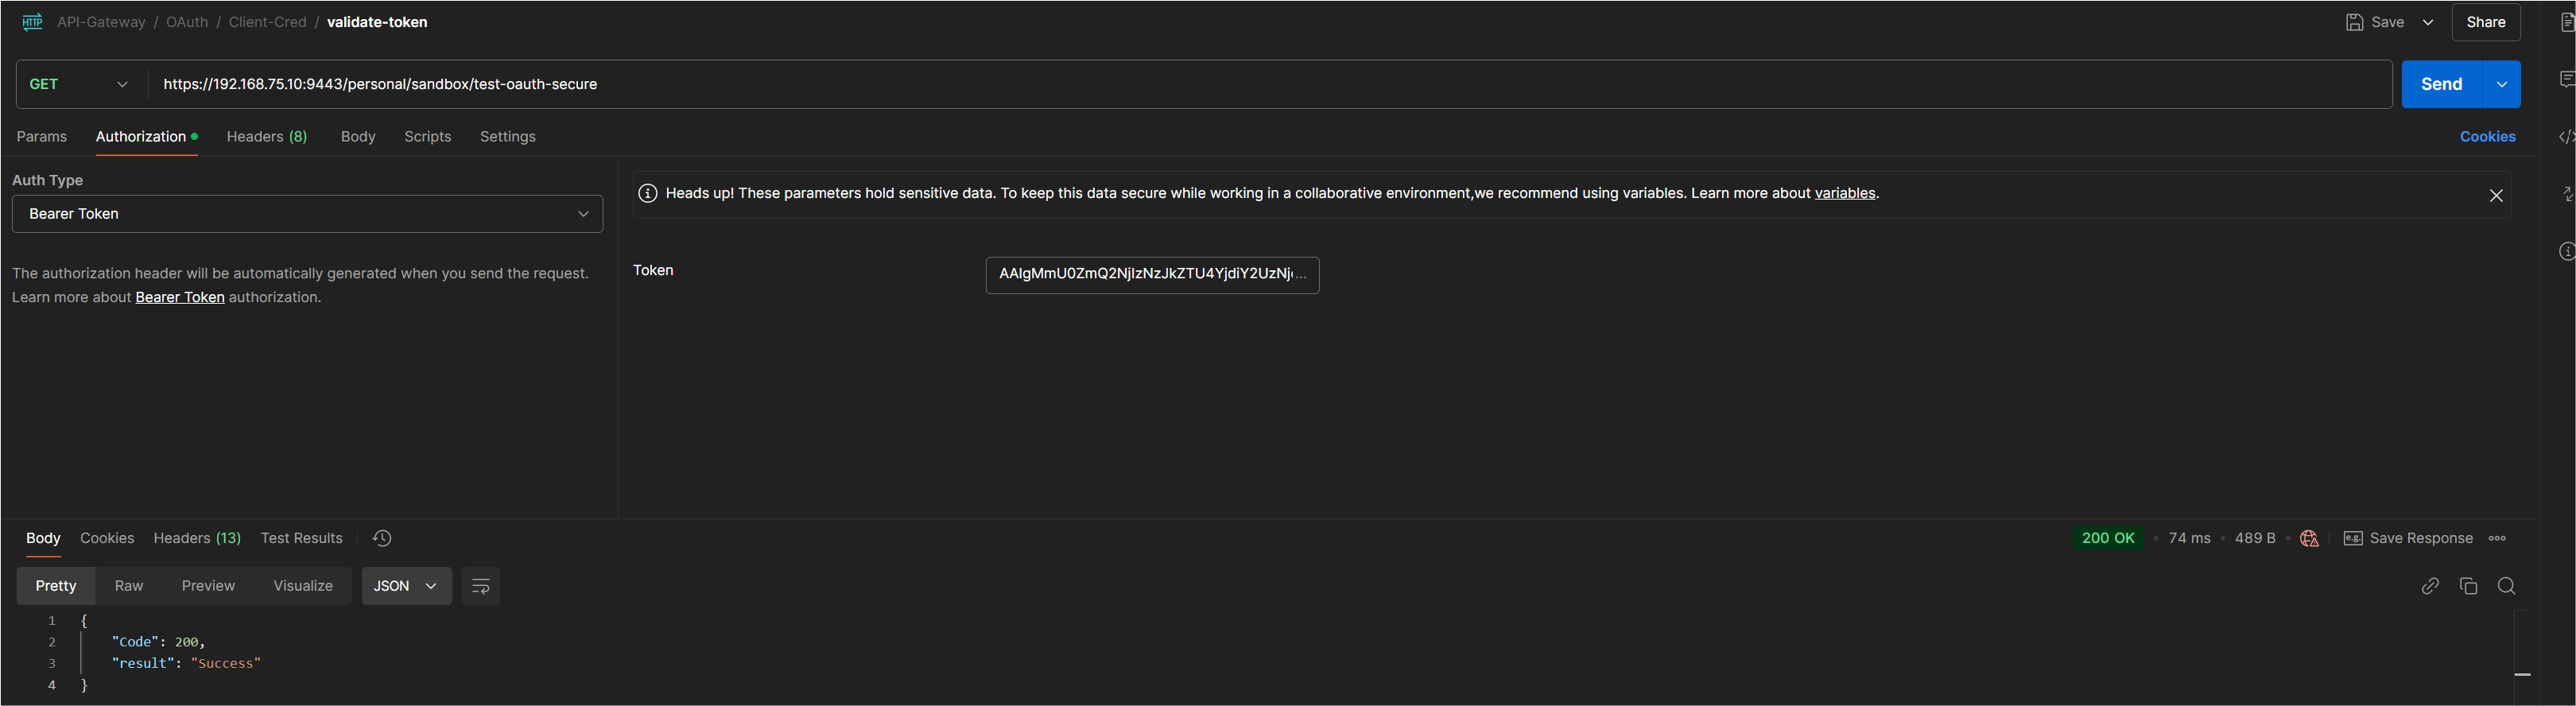
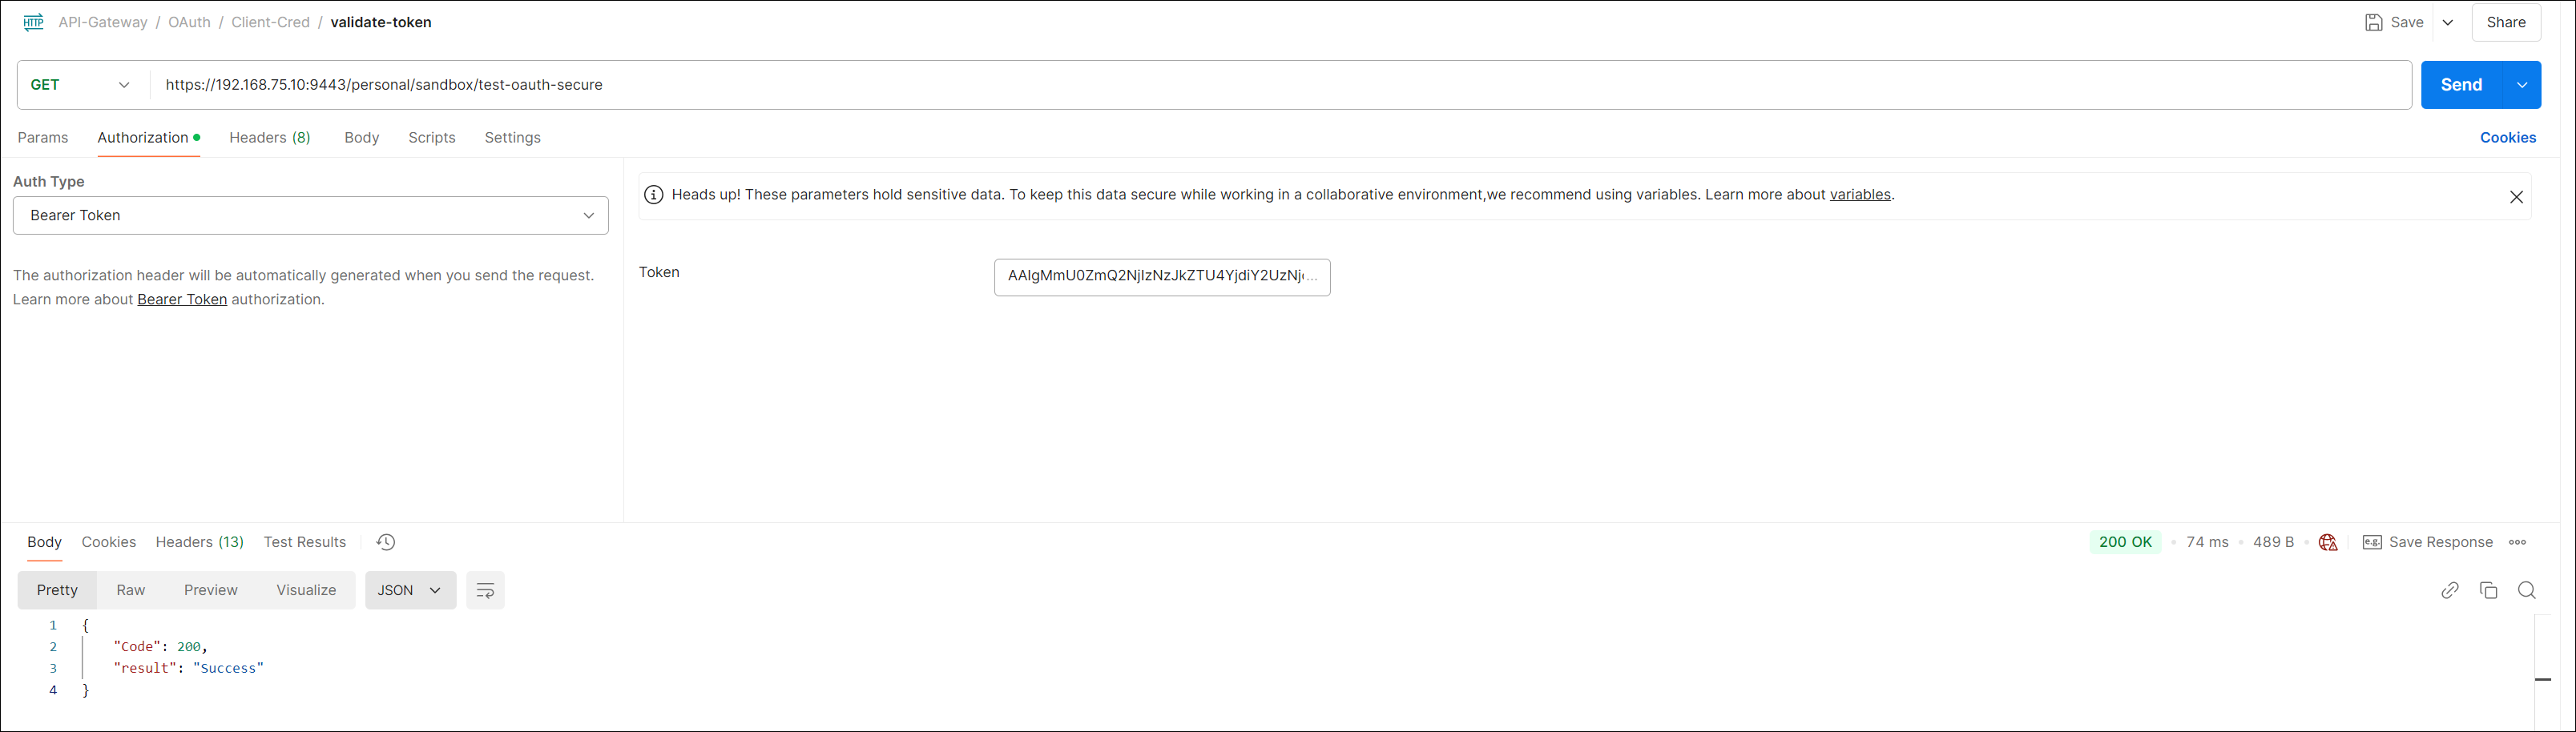 Postman Screenshot of token validation
Please do comment your thoughts and experience in API Management.
— Keep Learning 😊
— Aditya Singh
If this article helped you in someway and want to support me, you can …
