Implementing Advance Scope Check (before Token Generation) for Client Credential Grant in IBM API Connect v10
Hello Tech Enthusiasts 👋,
This article talks about implementing ‘Advance Scope Check’ in IBM API Connect v10. If you’re new to my technical blog, I’d recommend to checkout my last article link, where I’ve covered basics on OAuth and implementing Client Credential (Application) grant type in IBM API Connect.
Overview
For any organization, Security is on top priority. To begin with, let’s understand the importance of scopes in the OAuth framework.
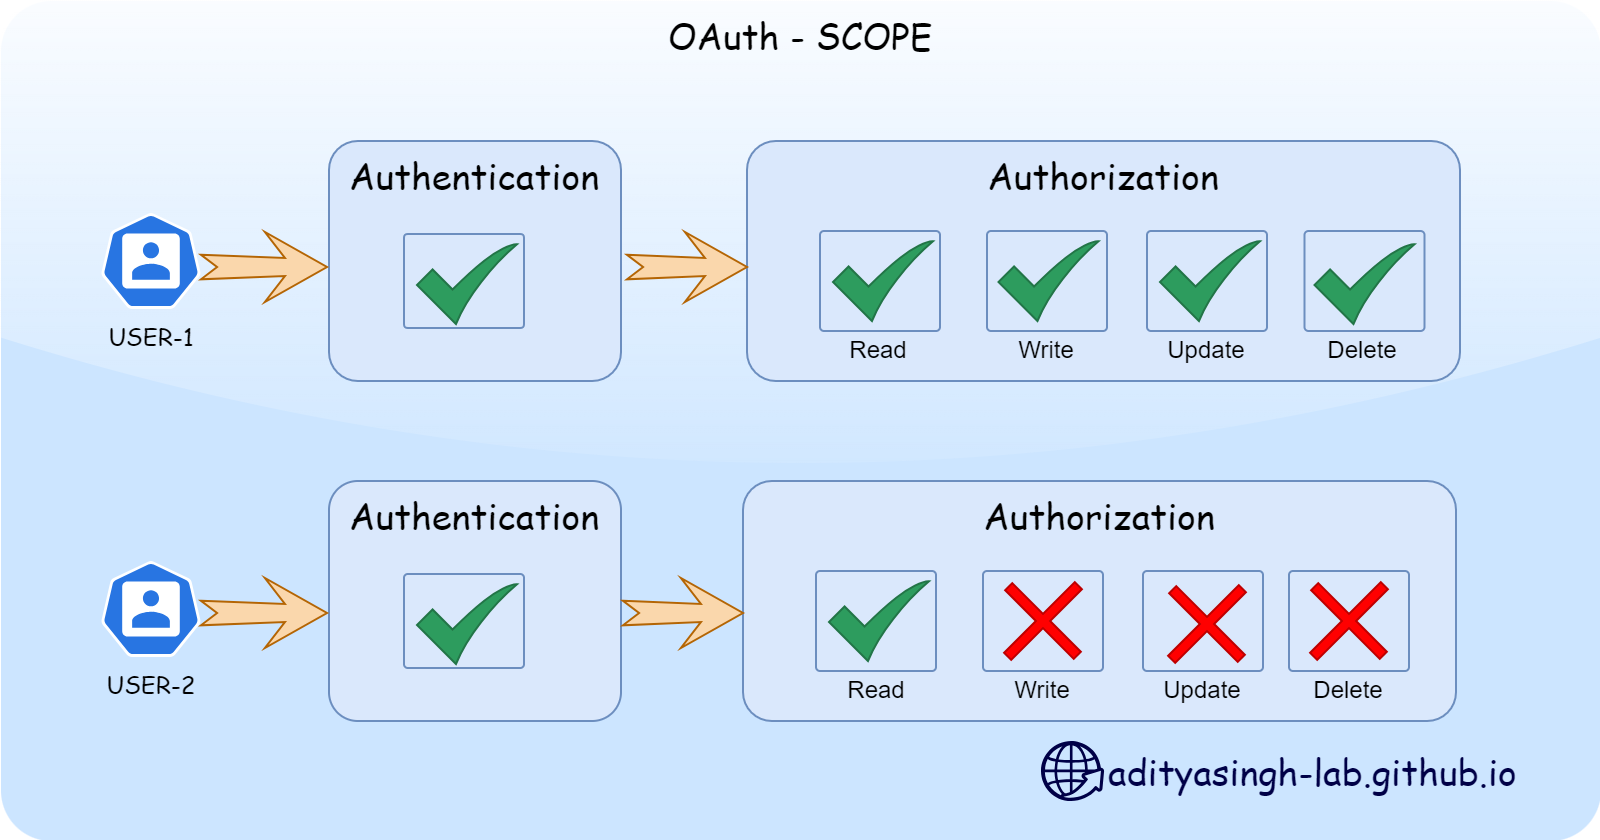
In the authentication and authorization flow of OAuth, authentication is managed through credential verification, while authorization determines access to resources. For example, User-1 might have full access (read/write/update/delete) to a resource or application, whereas User-2 might only have read access to the same resource. This variation in access levels for a particular resource or application is referred to as the scope of access.
Scope Standard
There is no standardized naming convention for scopes. However, as a best practice I recommend using the format <application/resource>:<_access-level_>, while super-user or applications can have _application_ scope omitting the access level, to indicate unrestricted access.
Example:
- Accessing bank account (Account API) : account:read , account:write, account:update, account:delete
- Accessing credit information (Credit) : credit:read, credit:write
Alternatively, you can use underscores (_) or hyphens (-) instead of colons (:) such as account-read , or account_read.
Why Scope Check is important ?
I’d like to reference the Zero Trust concept here, which operates on the principle of NEVER TRUST, ALWAYS VERIFY.
By default, when application request token, the Native OAuth Provider checks if the application is subscribed to the API which has OAuth security enforcement. The API could have multiple paths/operations typically aligned with CRUD (Create/Read/Update/Delete) model as per API standards and best Practices. Since these are distinct operations, it is often necessary to enforce access restrictions for specific applications or users.
n a native OAuth provider, it is challenging to determine whether an application subscribed to an API plan is authorized for a specific operation. One alternative is to create multiple plans for each operation, but this approach introduces significant complexity—both operationally and conceptually. A better solution is to implement this with the correct approach, namely Advance Scope Check.
How to implement Simple Advance Scope Check ?
High Level Steps of implementation:

 Implementation Steps
Key Considerations for Implementation
To implement Advance Scope Check, we’d need additional service that would :
- The advance scope check service should map the input application & it’s supplied scope through a property file and returns the allowed scope in response http header
x-selected-scope. - In case unable to identify, the service should reject the transaction and return non-200 response.
- The Native OAuth Provider looks for
x-selected-scopeand override allowed scopes.
Step 1: Create Scope Check Service
The scope service can be implemented and hosted at any application / server. I’m creating and hosting it on DataPower itself (in separate non-apim domain). The service type I’ve implemented is a XML-Firewall service with loopback backend type.
- Create XML Firewall with loopback type.
- Configure local-ip as 127.0.0.1 so that service isn’t accessible from outside.
- Add policy with following implementation:
- Match action to match all incoming request.
- Convert Query param to convert the input GET request to XML
- Add transformation XSLT action which should function in following steps:
- Extract input
app_nameandtoken_scope. - Match it with attribute
app_nameandtoken_scopefrom the XML property file (Sample file below 👇) - Set
x-selected-scopeheader with mapped value. - If no value match, log error message
No Application Scope Match
- Extract input
- Add result action
1
2
3
4
5
6
7
8
9
10
11
<!-- Sample XML Property file -->
<AdvanceScopeCheck>
    <!-- Application-1 scope -->
    <Scopes app_name="application-1" token_scope="scope1">
    scope1:read scope1:write scope1:update scope1:delete
    </Scopes>
    <!-- Application-2 scope -->
    <Scopes app_name="application-2" token_scope="scope1">
    scope1:read
    </Scopes>
</AdvanceScopeCheck>
The
application-1andapplication-2are the client app that we’d be creating later in Add Subscription.
Step 2: Add Scope Service URL and OAuth Scope in Native OAuth Provider
- Go to Resources > OAuth Provider
- Select the Native OAuth Provider
- Select Scope section from design tab and check Advanced scope check before Token Generation
- Add Endpoint URL as
http:127.0.0.1:<port>/and the click save.
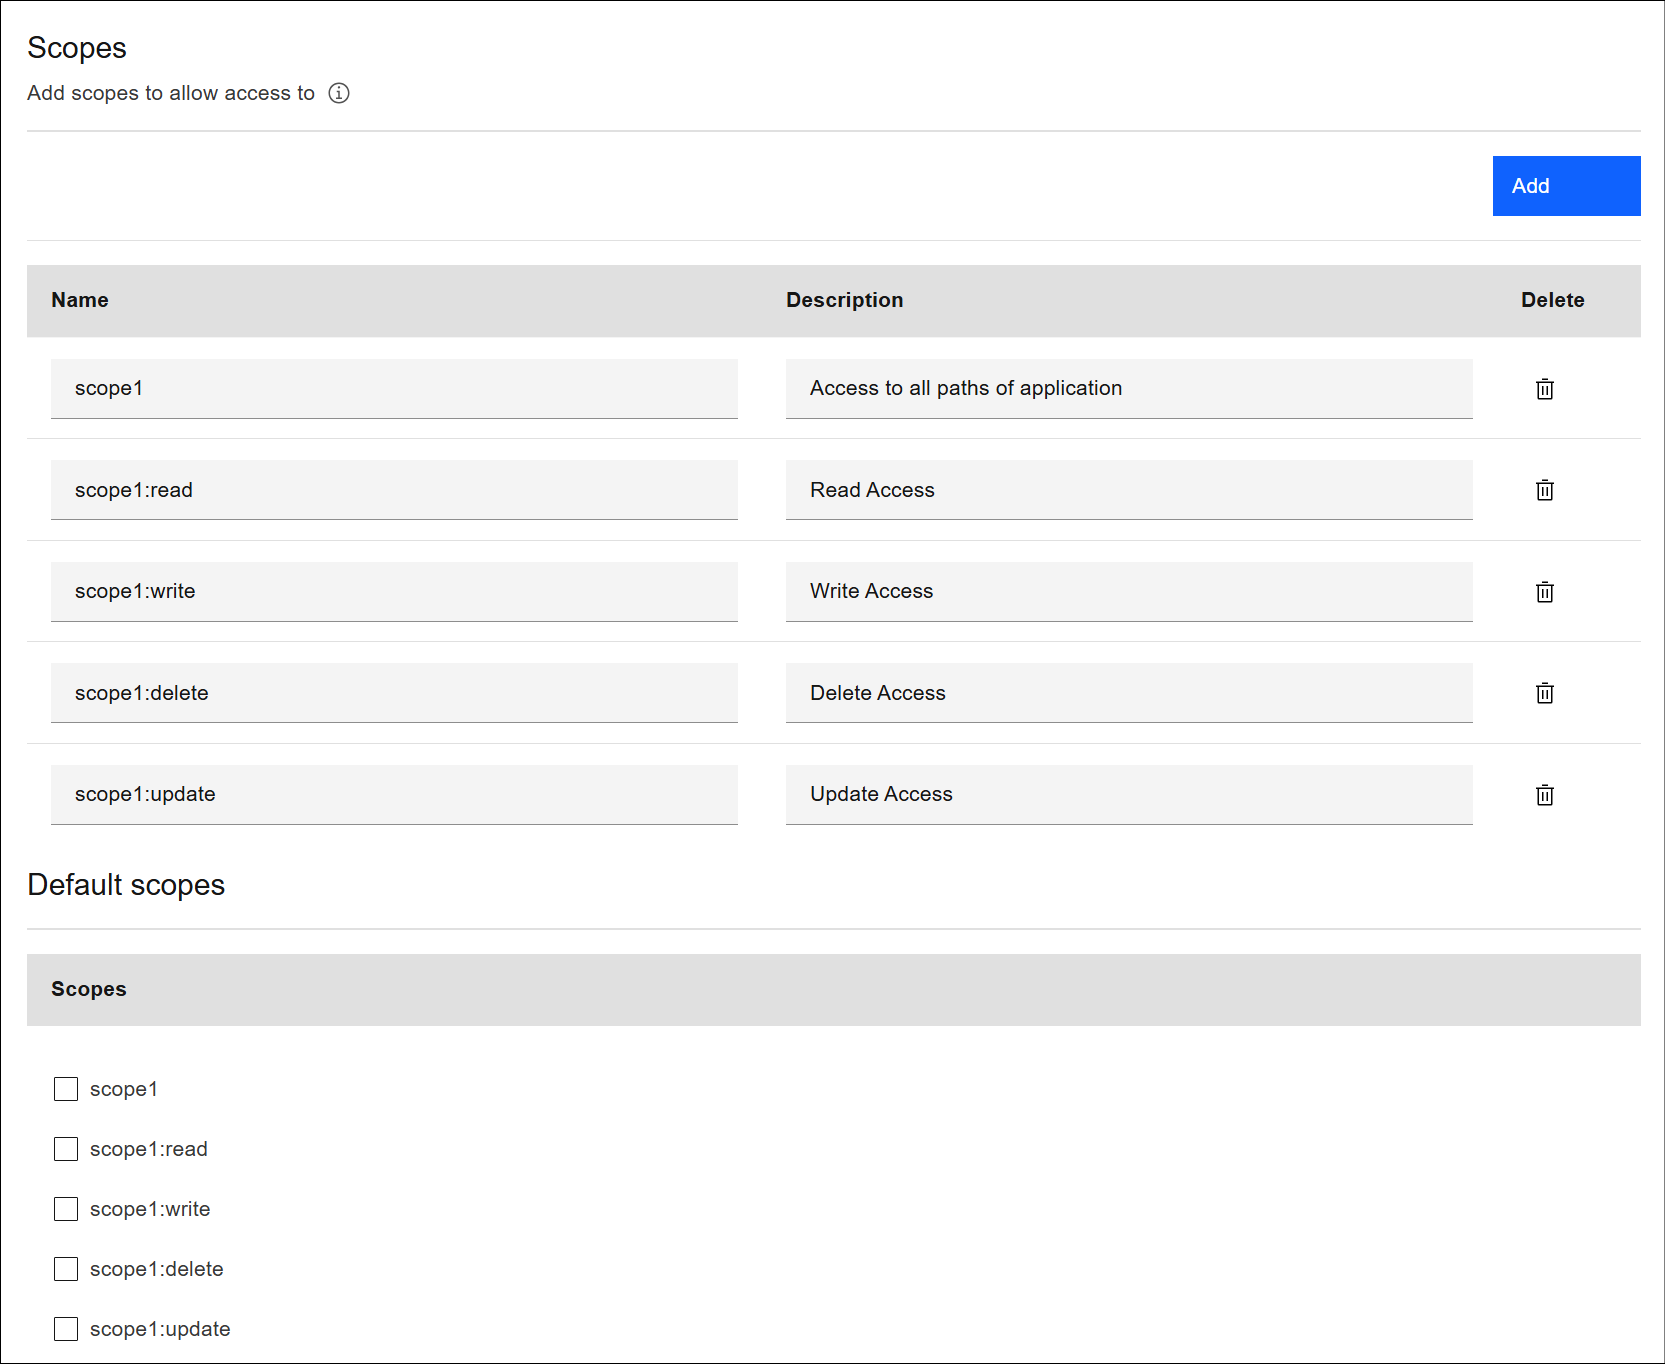 Sample Scopes in Native OAuth Provider API
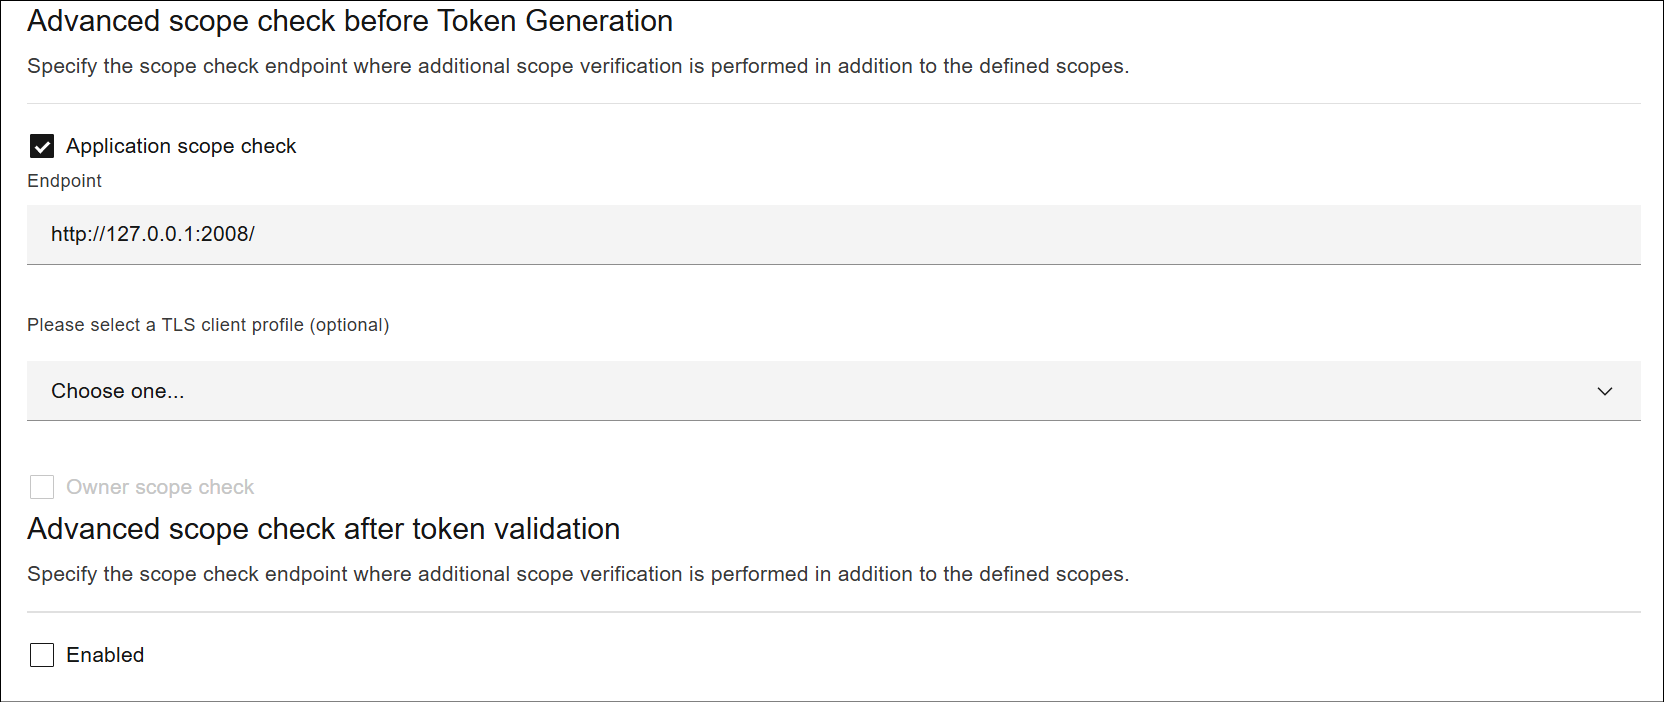 Advance Scope Check Sample in Native OAuth Provider
(Optional) The default error generates non intuitive response, so additionally, In the Assemble part, I updated the gateway script ‘oauth-auto-generated-advanced-scope-application’ for non-200 response as :
Step 3: Create/Update OAuth Secure API
In my API, I created 4 operations for single path and modified the security:scope specifically. Here is the sample yaml file
1
2
3
4
5
6
7
8
9
10
11
12
13
14
15
16
17
18
19
20
21
22
23
24
25
26
27
28
29
30
31
32
33
34
35
36
37
38
39
40
41
42
43
44
45
46
47
48
49
50
51
52
paths:
  /test-oauth-secure:
    get:
      responses:
        '200':
          description: success
          schema:
            type: string
      security:
        - oauth-client-cred:
            - scope1:read
    post:
      responses:
        '200':
          description: success
          schema:
            type: string
      security:
        - oauth-client-cred:
            - scope1:write
    delete:
      responses:
        '200':
          description: success
          schema:
            type: string
      security:
        - oauth-client-cred:
            - scope1:delete
    put:
      responses:
        '200':
          description: success
          schema:
            type: string
      security:
        - oauth-client-cred:
            - scope1:update
securityDefinitions:
  oauth-client-cred:
    type: oauth2
    x-ibm-oauth-provider: oauth-client-credential-grant
    flow: application
    tokenUrl: https://$(catalog.url)/oauth-client-credential-grant/oauth2/token
    scopes:
      scope1: Access to all paths of application
      scope1:read: Read Access
      scope1:write: Write Access
      scope1:delete: Delete Access
      scope1:update: Update Access
security:
  - oauth-client-cred: []
Step 4: Add subscription
As specified above advance-scope-check-property.xml, create 2 applications and subscribe both to the OAuth-Secure-Client-Cred-API
 Sample Application Subscription
Step 5: Testing
Below sequence design 👇 depicts the advance-scope flow which we’re going to implement as part of this article:
 Advance Scope Check Sequence Diagram
- I’m using postman scripts to get token and use the token in my next operation.
- The following screenshot covers all the explanation. Add your comments in the posts if you’d like to additional details or reach out to me on my linkedIn.
5.1: Success / Happy-Path
5.1.1: Application-1 Testing
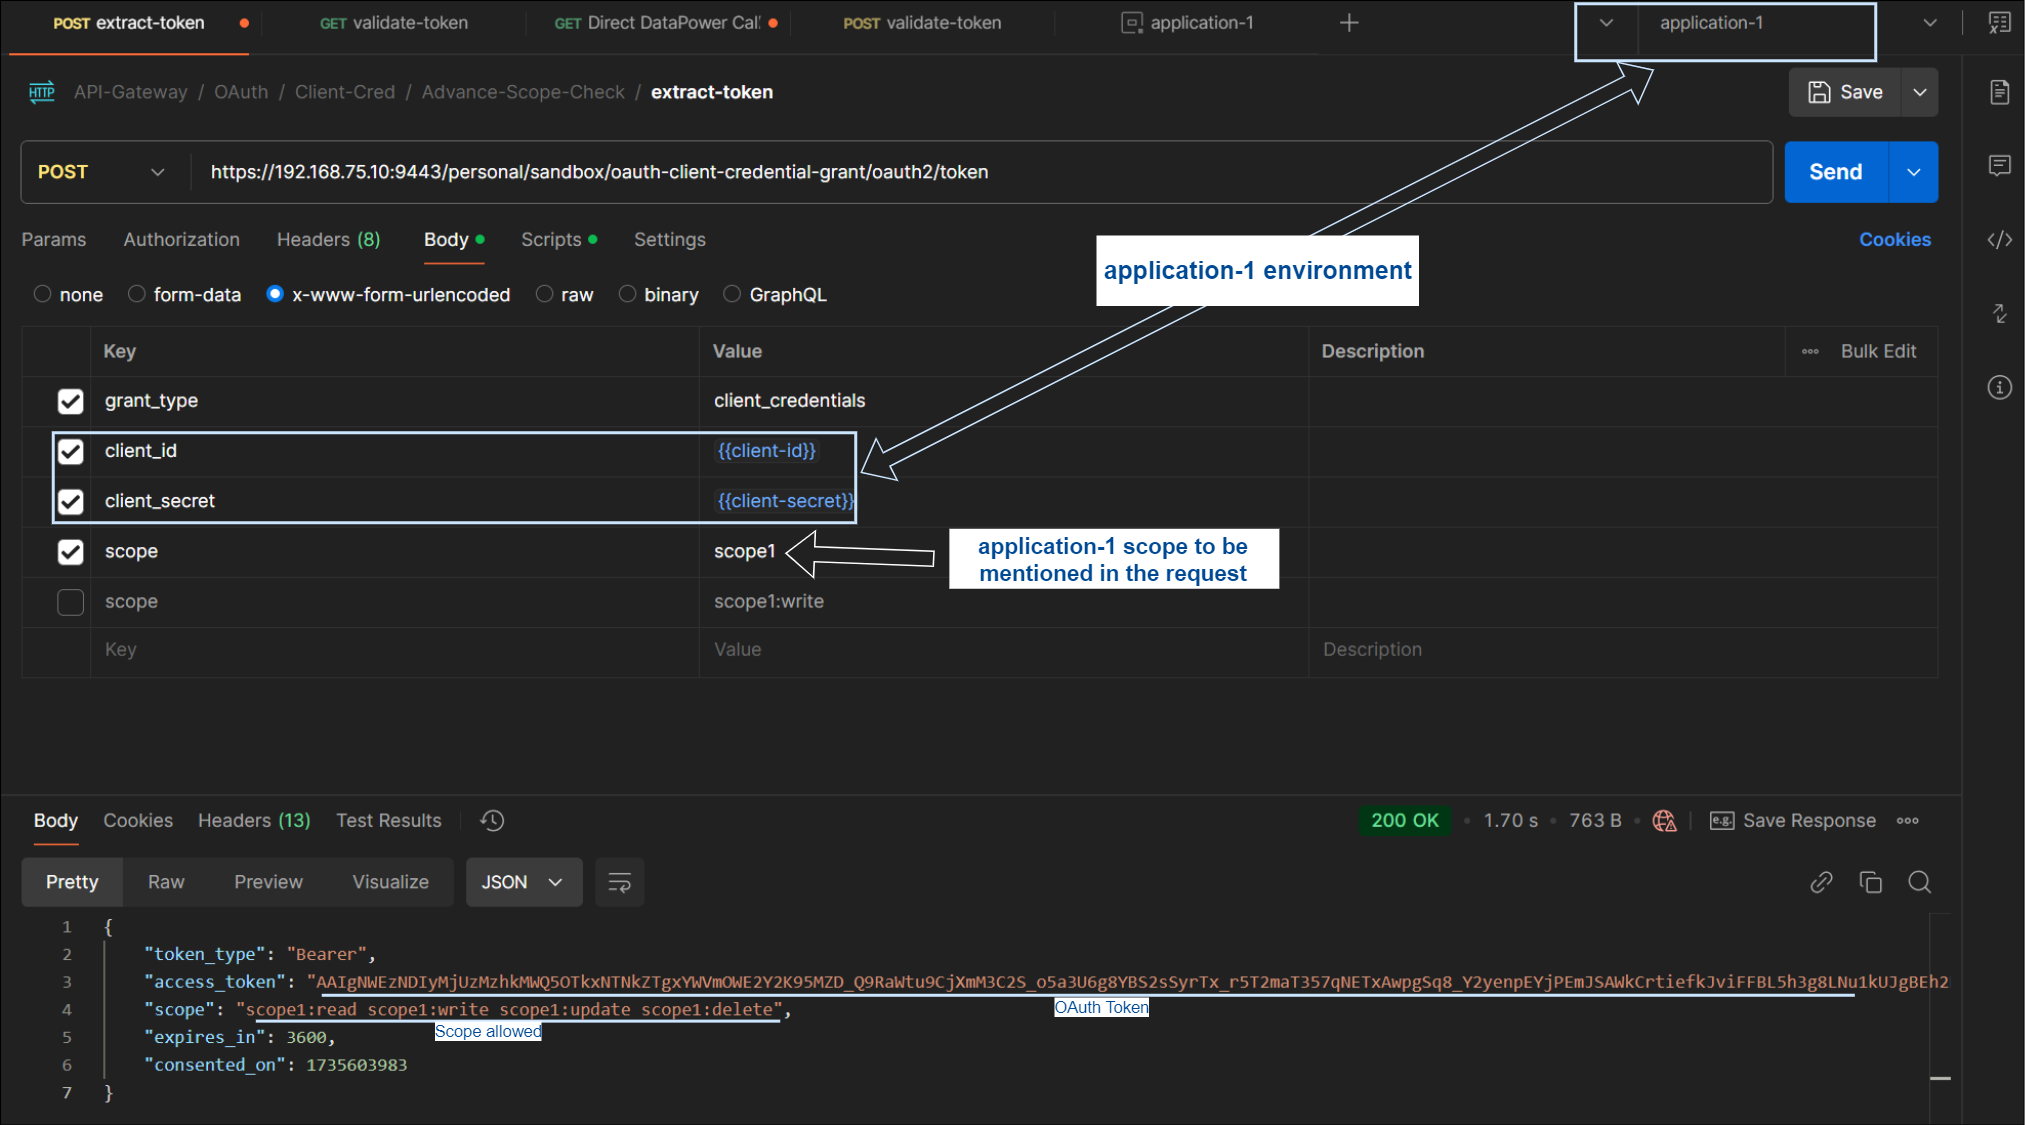 Application-1 : Get OAuth Token
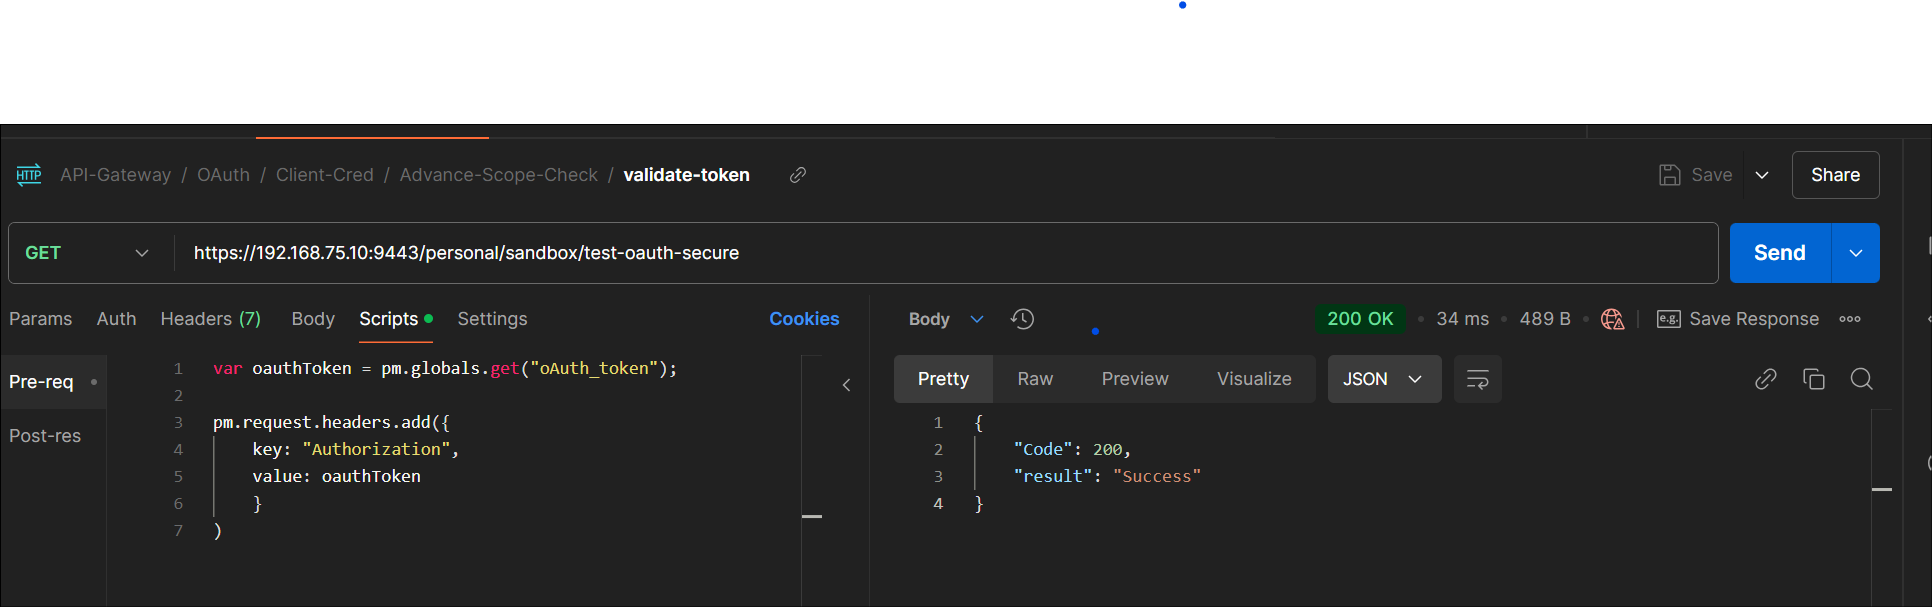 Application-1 : Validate Read operation
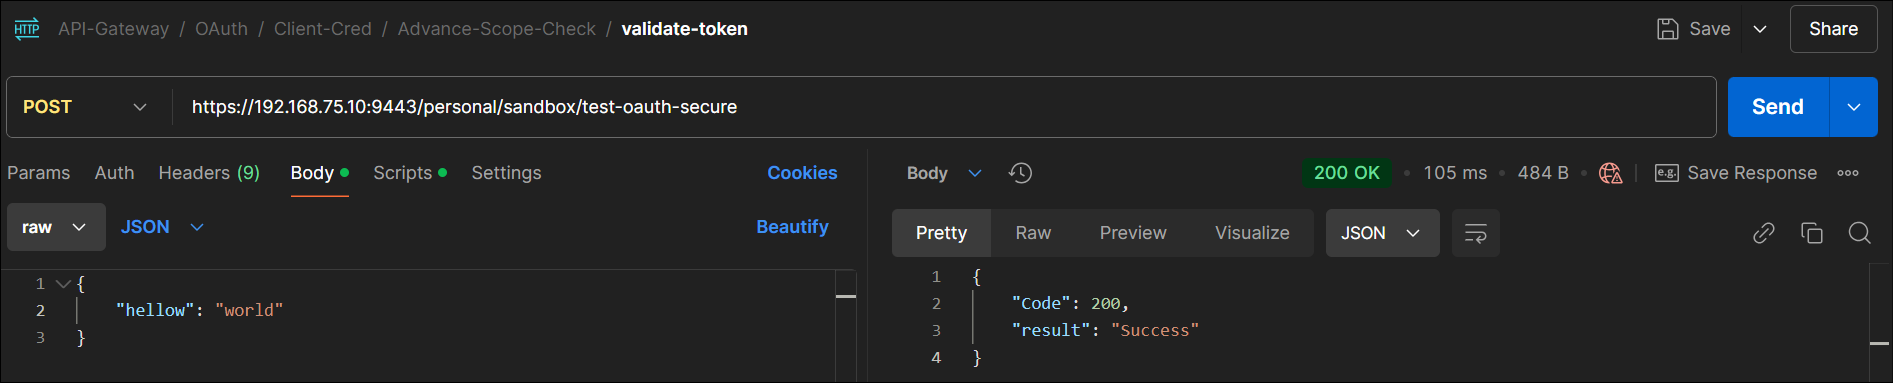 Application-1: Validate Write(Post) Operation
5.1.2: Application-2 Testing
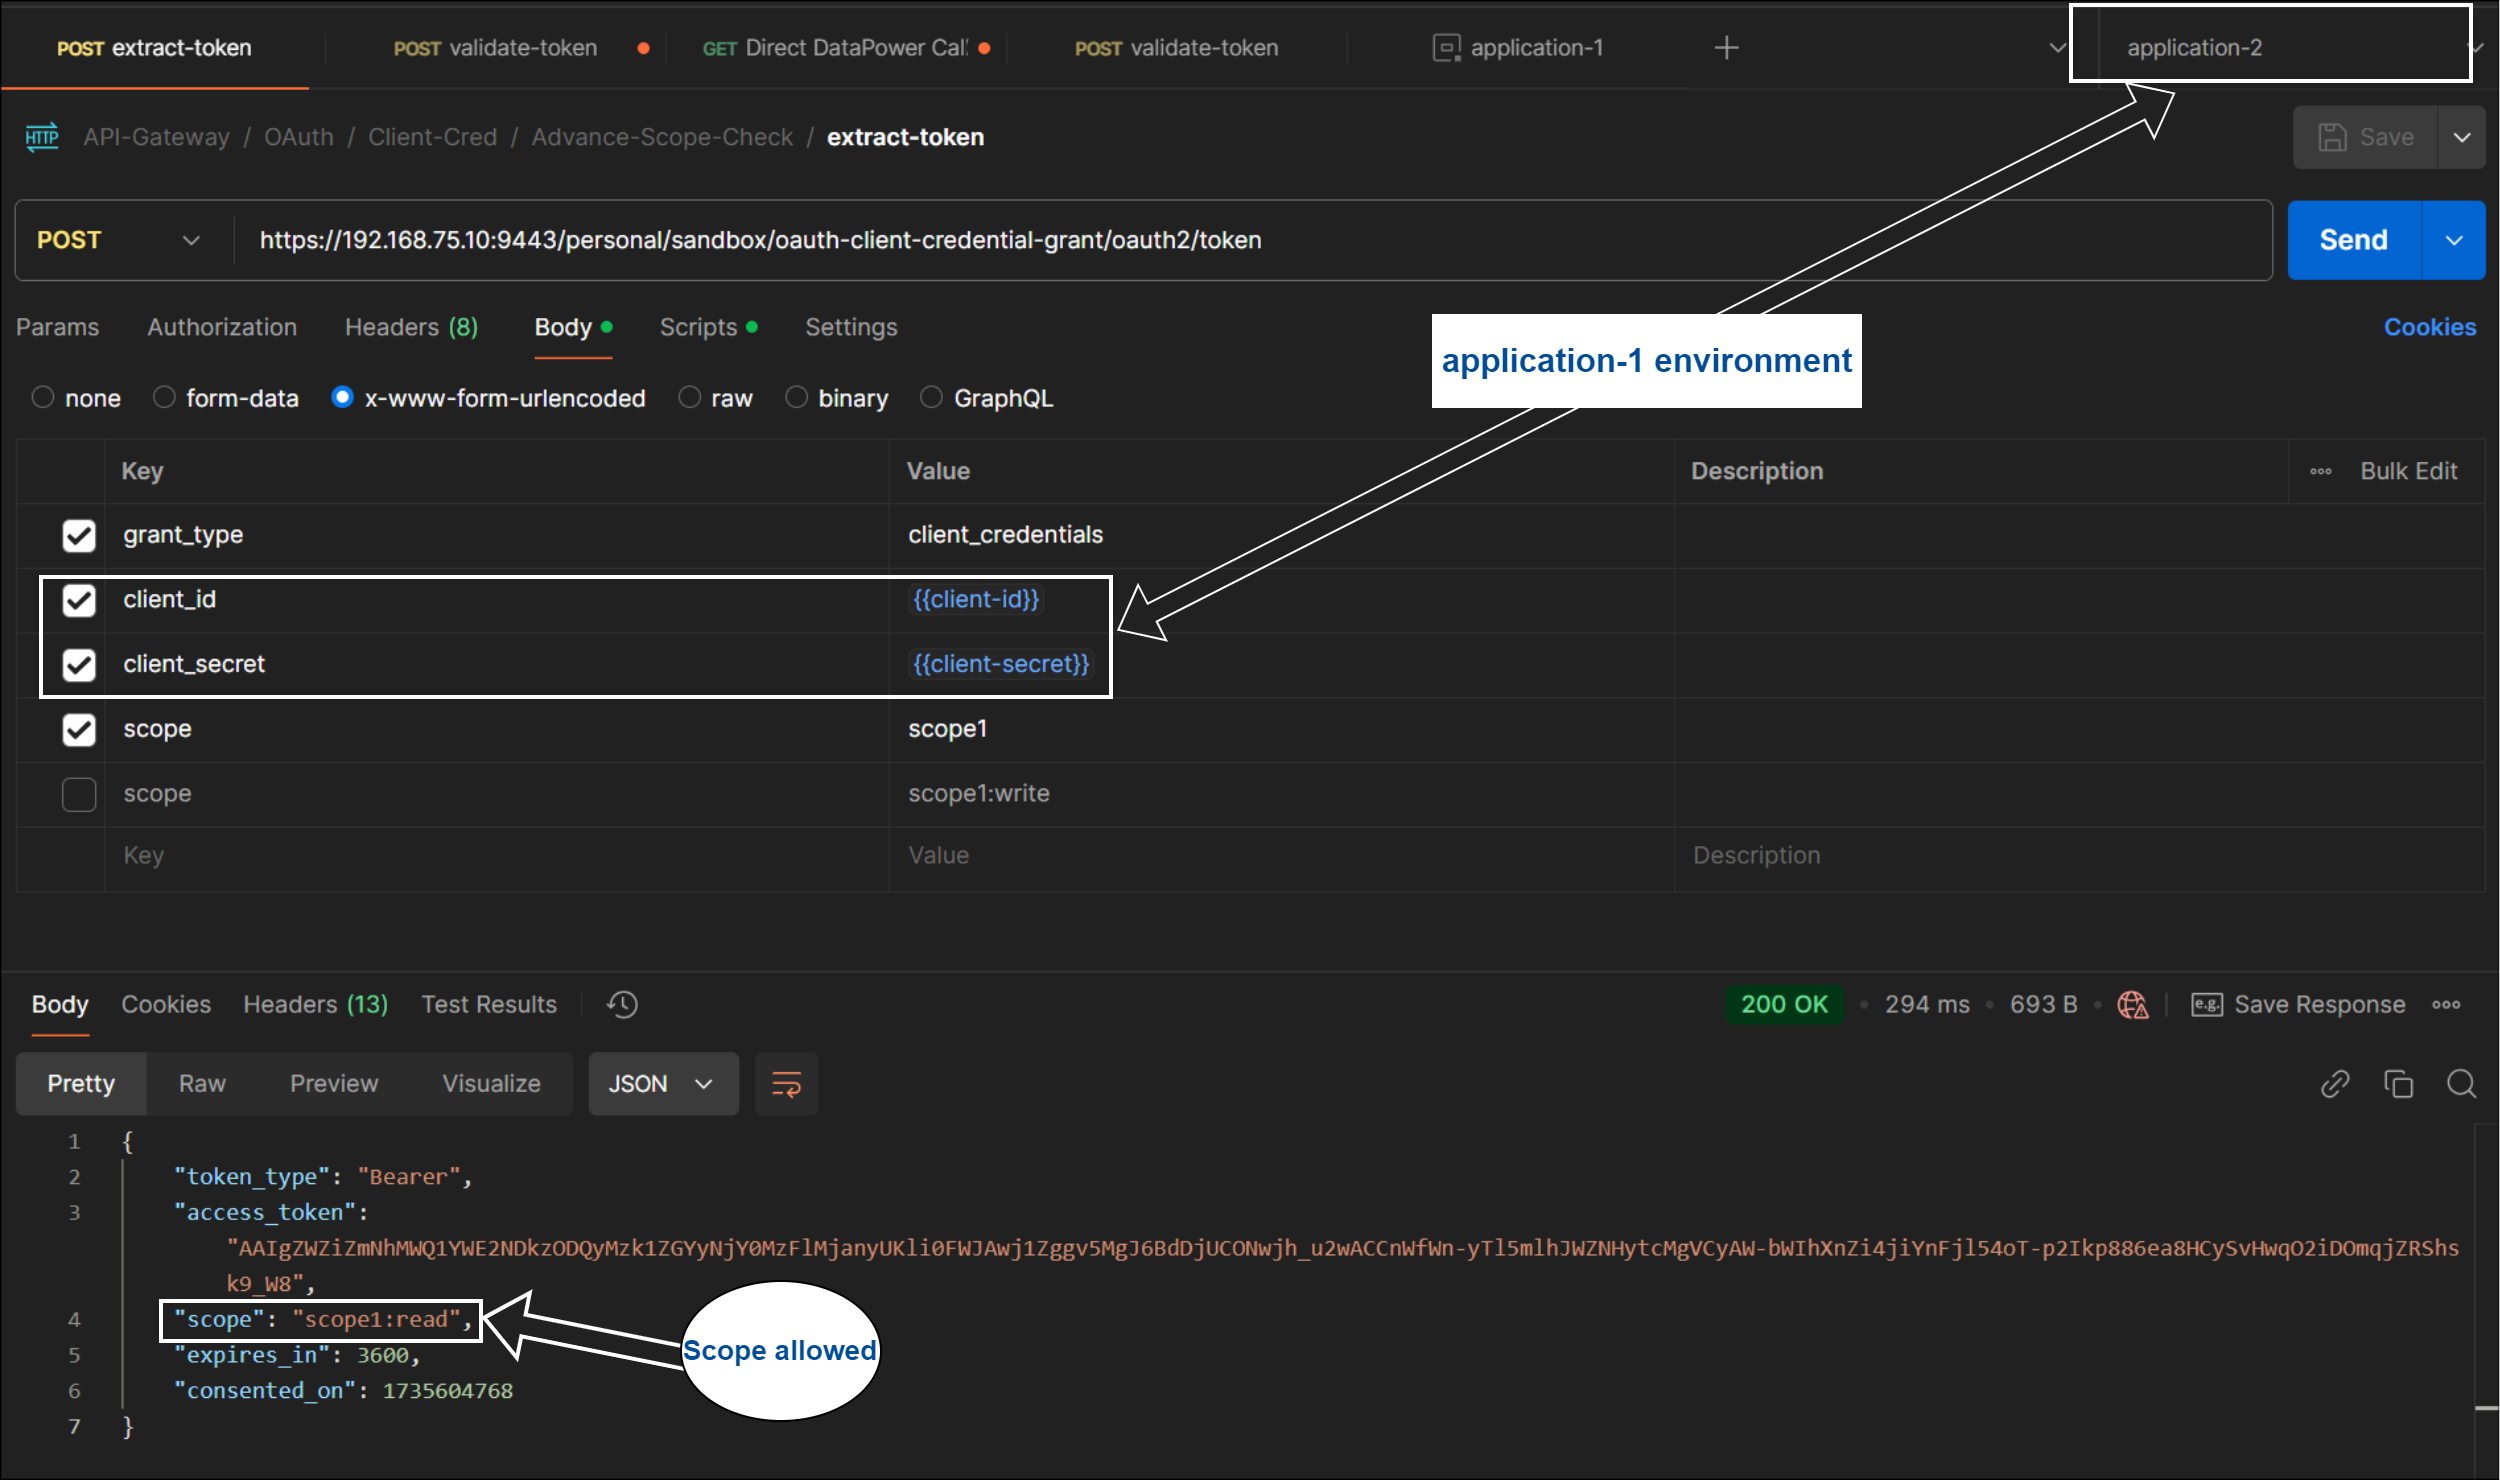 Application-2 : Get OAuth Token
Application-2 : Validate Read operation
5.2: Failure / Unhappy-path
5.2.1: No Scope as part of OAuth token request
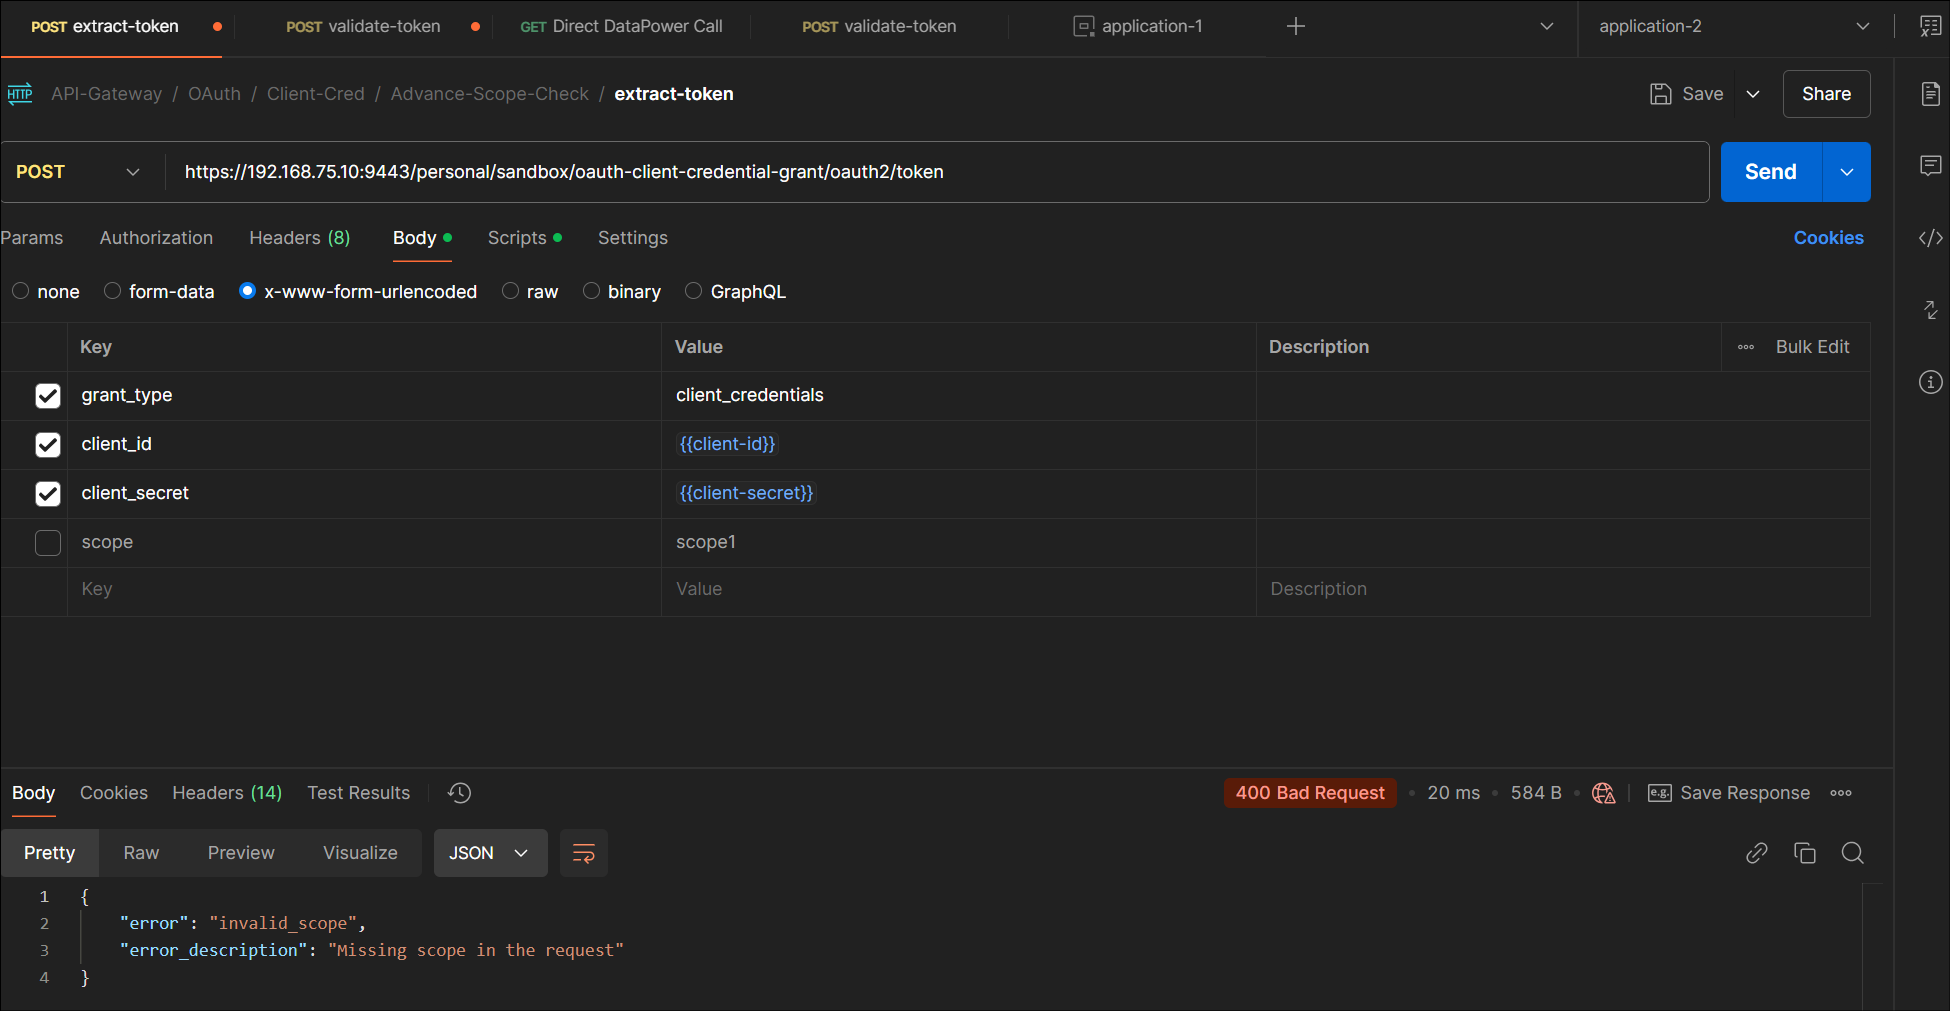 Error thrown when no scope in token request
5.2.2: Scope not part of listed scopes
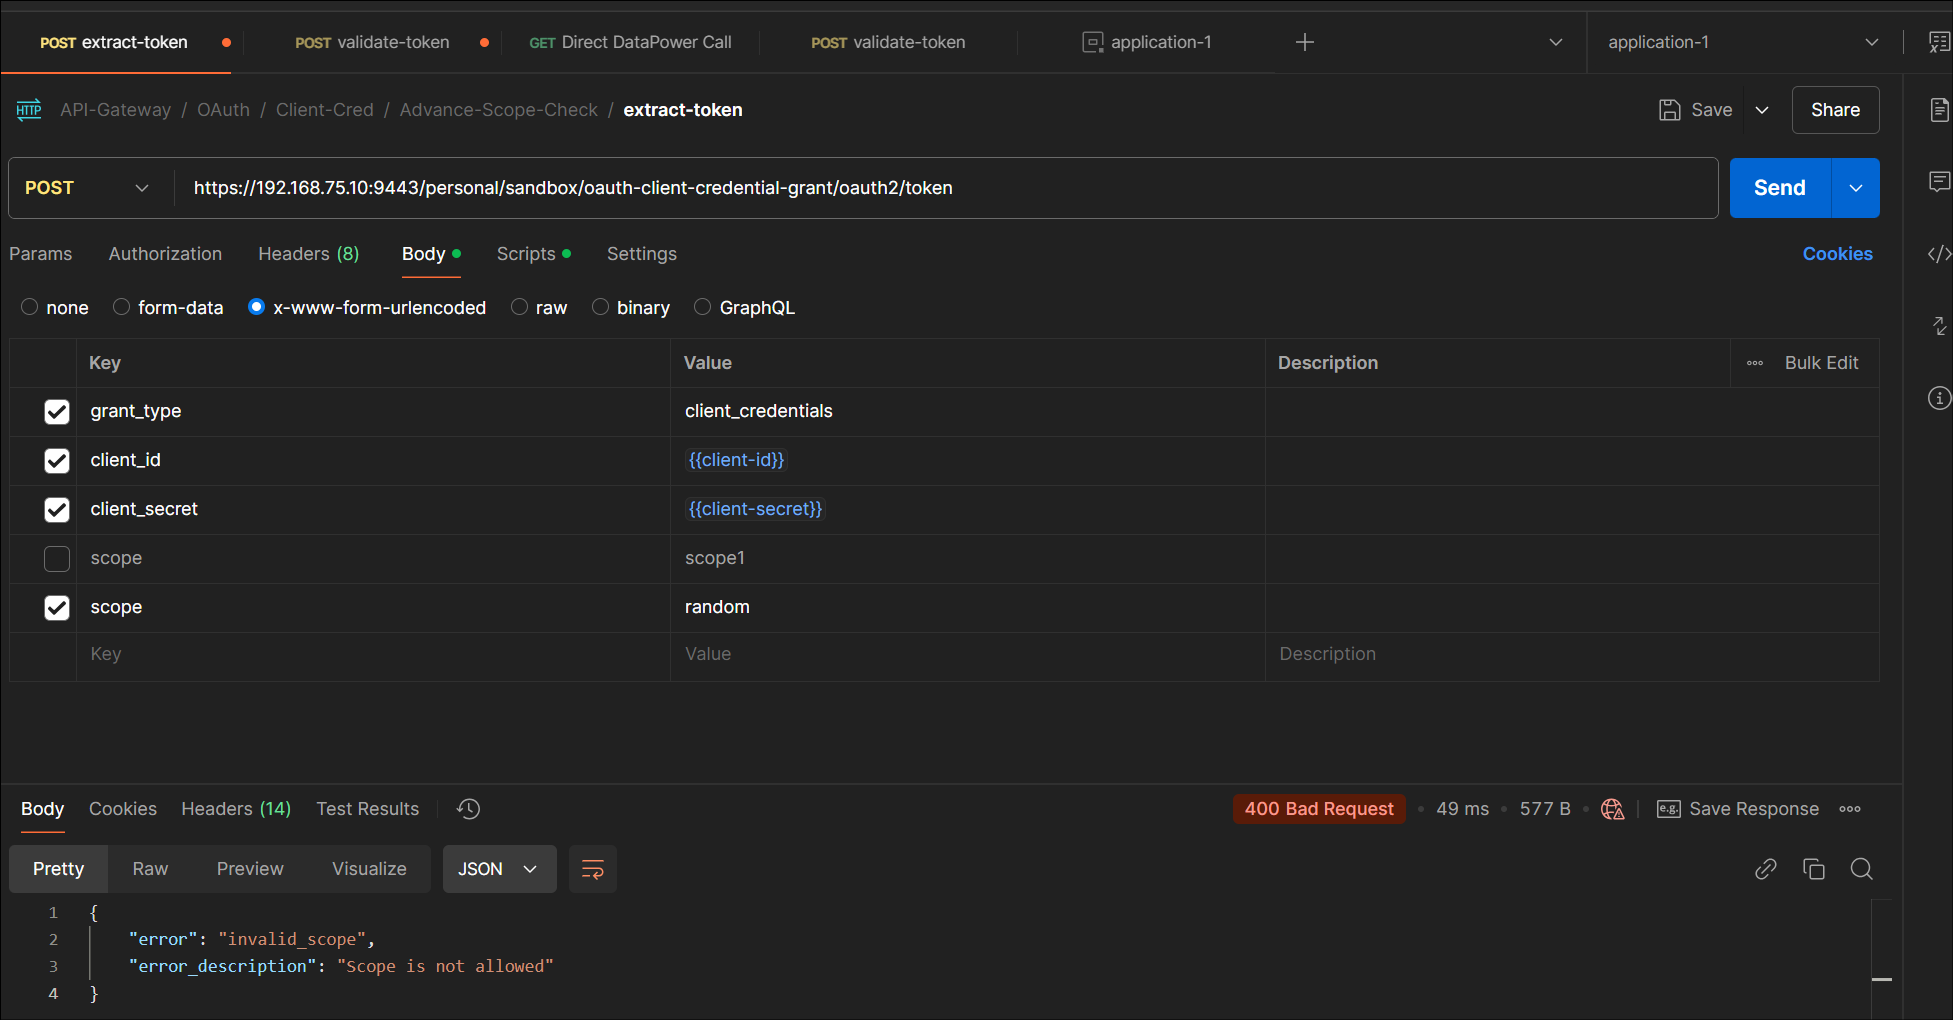 Error when Invalid Scope part of token request
5.2.3 Application-2 calling POST(write) Operation
The following screenshot depicts the behavior where application-2 trying to access POST (write) operation. The call get fails because Application-2 token scope doesn’t have access to scope:write.
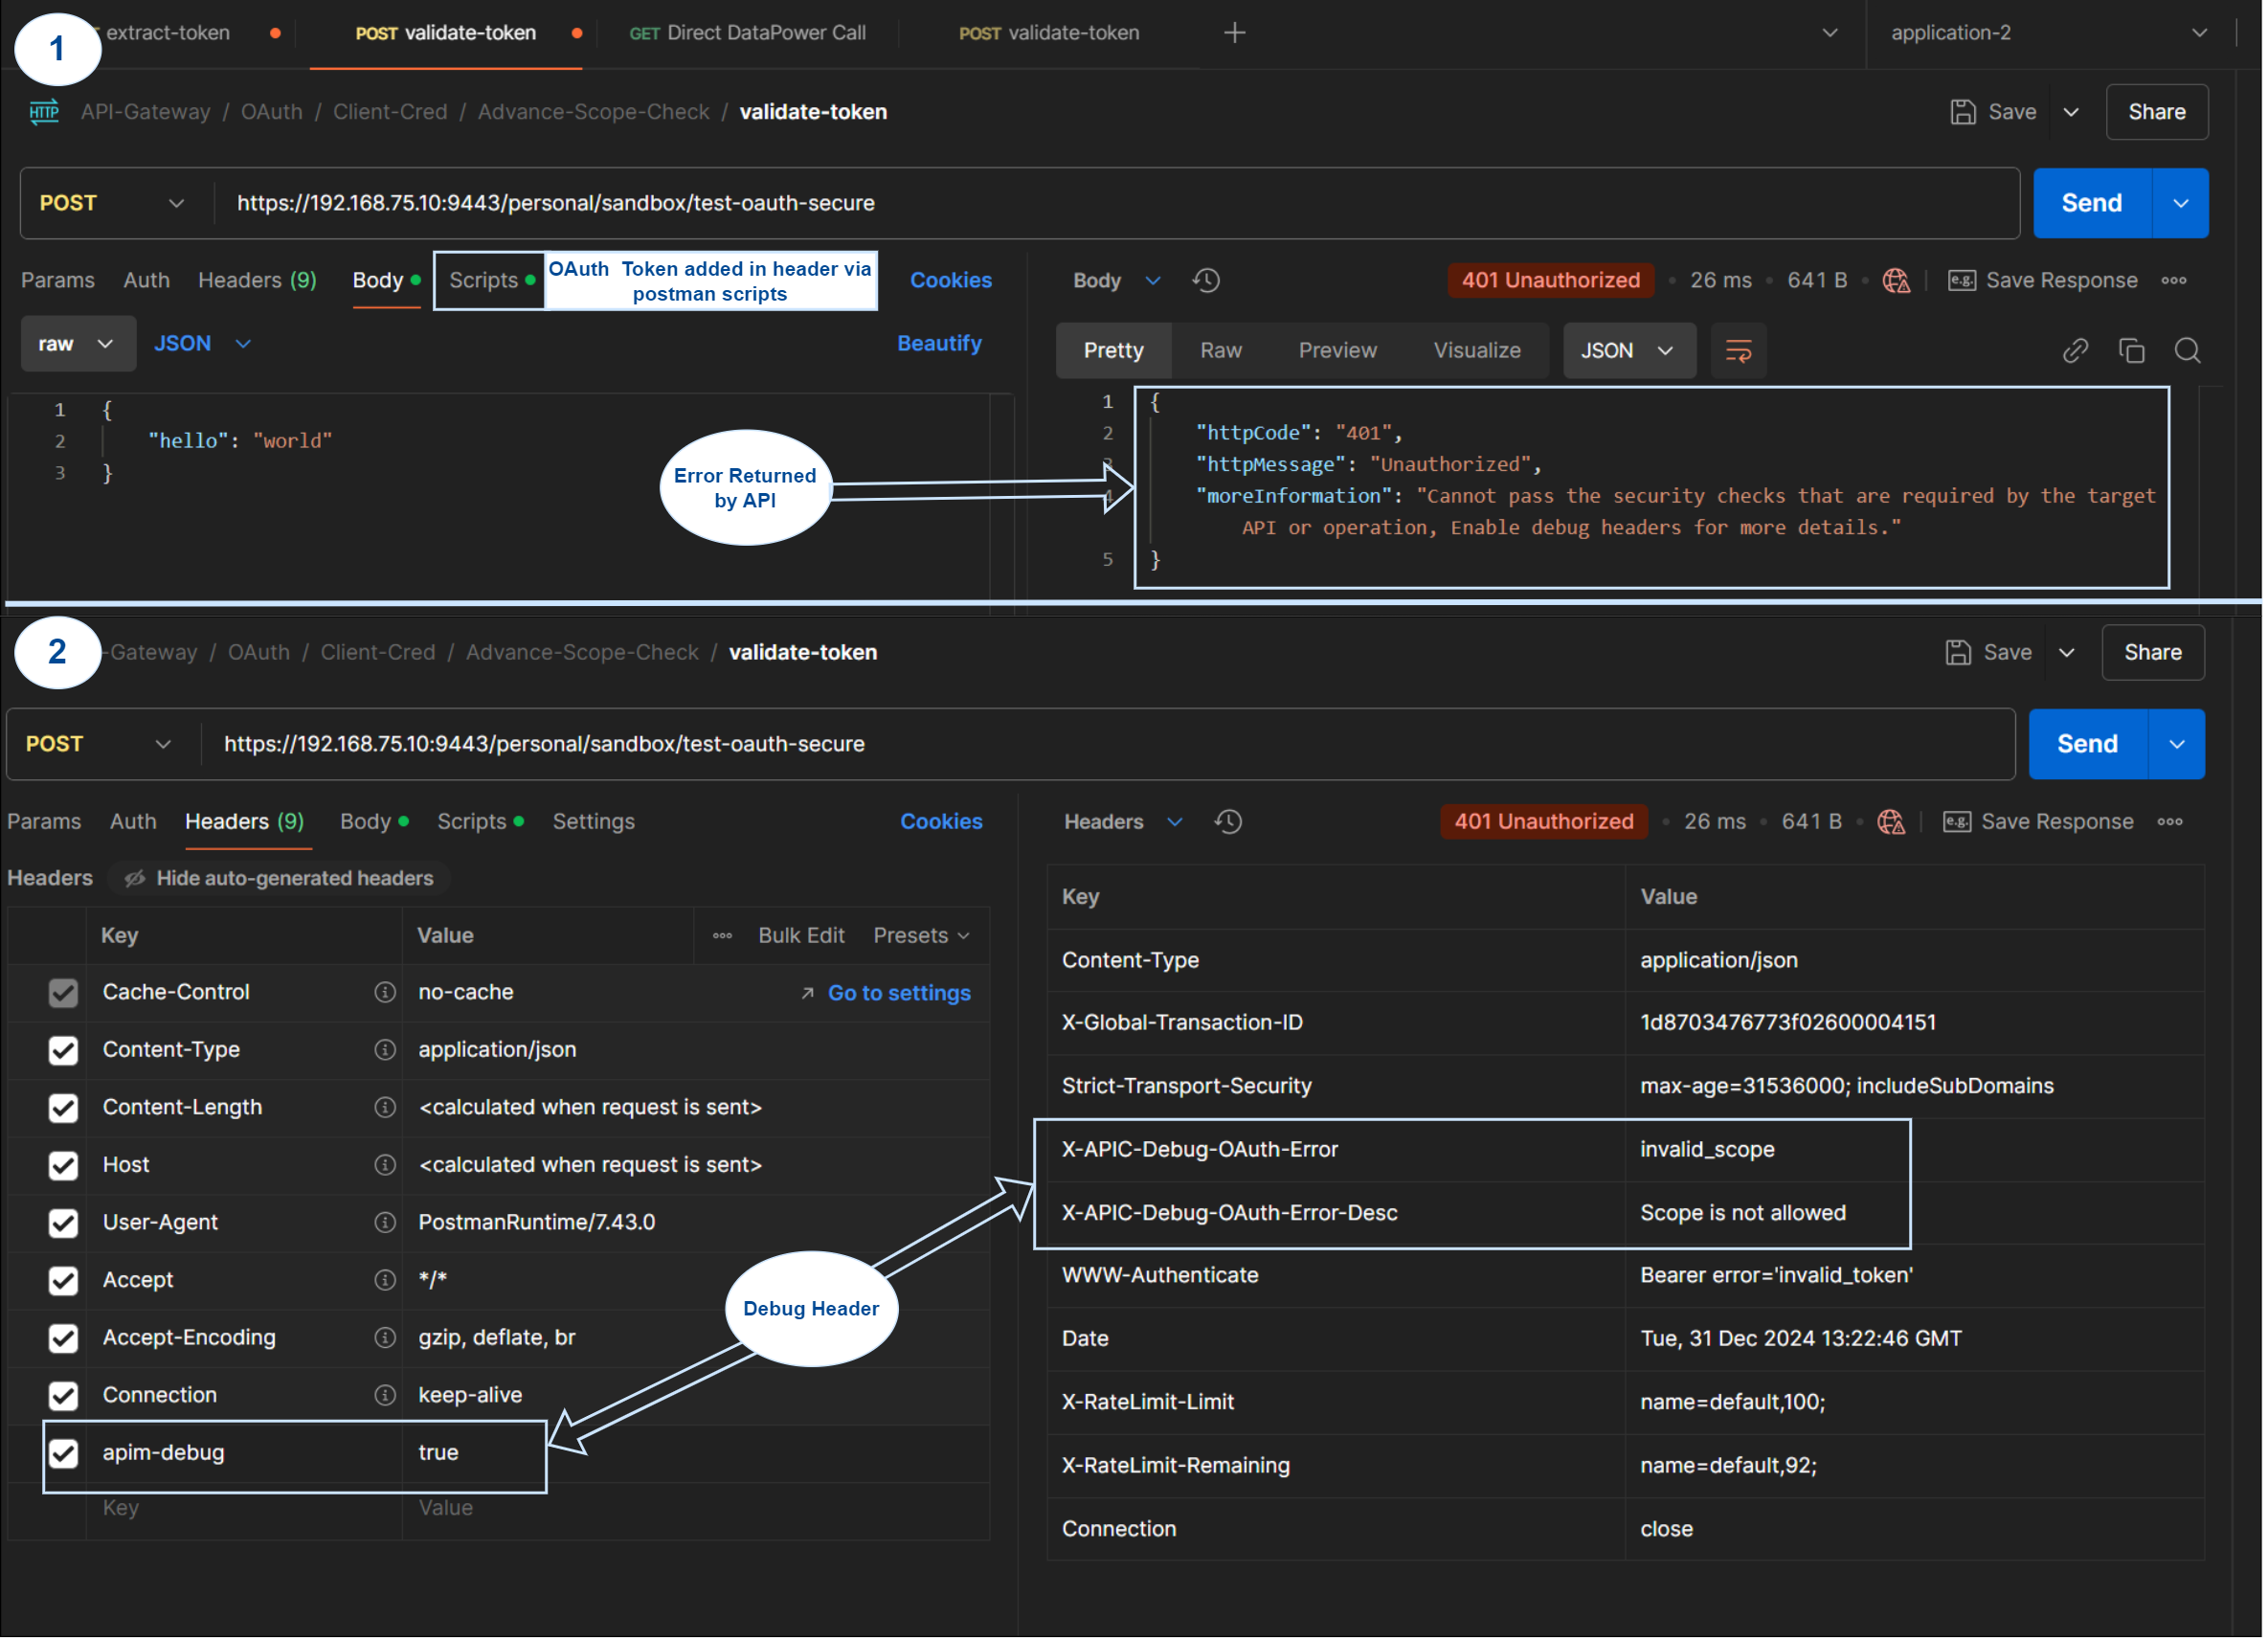 Application-2: Calling Write Operation (Error)
Please do let me know your thoughts and any question in comments.
— Keep Learning 😊
— Aditya Singh
If this article helped you in someway and want to support me, you can …
